


Introduction
In today’s digital landscape, securing systems is paramount, and certificate-based authentication offers a robust solution. This method uses digital certificates to verify the identity of users and devices, ensuring enhanced security. Implementing this with Microsoft Entra ID, Intune Cloud PKI, and Intune endpoint configurations provides a comprehensive approach.
Use Cases
- Enterprise Security: Protects sensitive corporate data by verifying user identities and devices, reducing the risk of unauthorized access.
- Remote Work: Ensures secure access for remote employees without relying solely on passwords, offering a seamless and secure user experience.
- Compliance: Meets regulatory requirements by providing an auditable trail of authenticated access, which is essential for industries with strict compliance mandates.
Value Proposition
Certificate-based authentication enhances security by eliminating password vulnerabilities, reducing the risk of phishing attacks, and providing strong, two-factor authentication. It simplifies user access, improves device management, and supports compliance with industry regulations. By leveraging Microsoft Cloud PKI, organizations can streamline their security infrastructure, achieve higher trust levels, and ensure robust protection across all endpoints.
Requirments
Licensing Requirements
You need one of the following licenses for Microsoft Cloud PKI:
- Microsoft Intune Suite license
- Microsoft Cloud PKI standalone Intune add-ons license
You need one of the following licenses for Intune
Microsoft Intune Plan 1 is required, which is included in the following licenses:
- Microsoft 365 E5
- Microsoft 365 E3
- Enterprise Mobility + Security E5
- Enterprise Mobility + Security E3
- Microsoft 365 Business Premium
- Microsoft 365 F1
- Microsoft 365 F3
- Microsoft 365 Government G5
- Microsoft 365 Government G3
- Microsoft Intune for Education
You need one of the following licenses for Entra ID
- EntraID Premium P1
- EntraID Premium P2
What is Certificate-Based Authentication?
Certificate-based authentication is like using a digital ID card to prove your identity online. Here’s how it works:
- Digital Certificates: These are electronic ID cards issued by a trusted authority. They contain information about your identity.
- Verification: When you access a system, your device presents this certificate. The system checks if it’s valid and belongs to you.
- Security: Because certificates are hard to fake, they provide strong security. Even if someone knows your password, they can’t access the system without the certificate.
Benefits:
- Enhanced Security: Harder to fake than passwords.
- Convenience: No need to remember complex passwords.
- Trustworthy: Issued by trusted authorities.
In short, certificate-based authentication uses digital certificates to securely verify users and devices, ensuring only authorized access.
Lets set it up
First, we’ll create a security group and assign a test user to it. This group will be used to assign all the policies we are creating today, ensuring they are scoped to just that one user for testing. Next, we’ll set up Intune Cloud PKI and configure Intune to deploy the root and SCEP certificates to the endpoint. After that, we’ll walk through setting up certificate-based authentication in EntraID and explain the user experience.
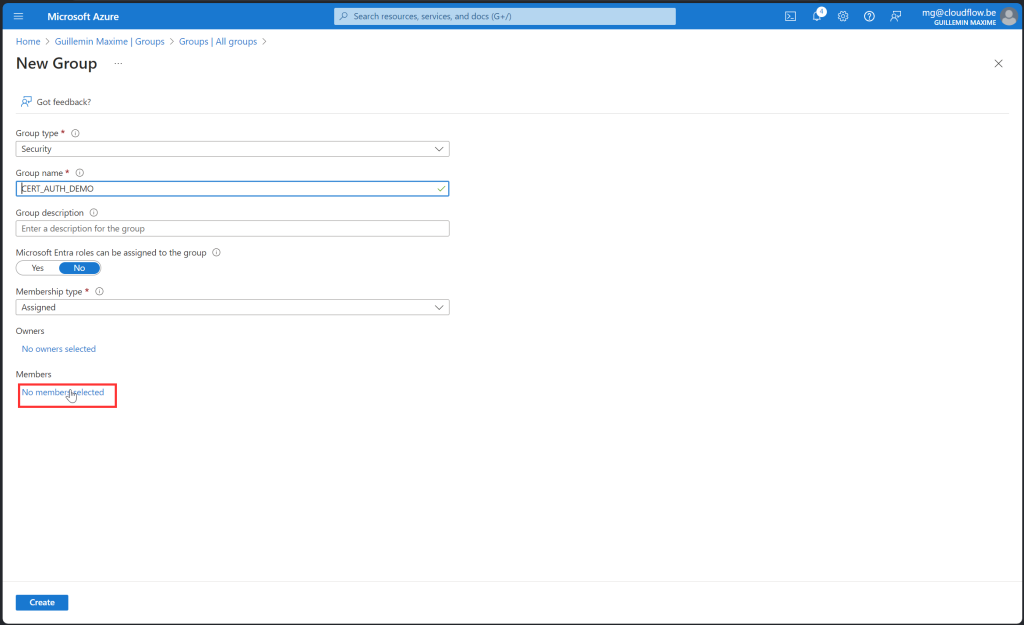
Security Group
Creating a security group in EntraID (Azure Active Directory) is a straightforward process. Follow these steps to get it done:
- Log into the Azure Portal: Azure Portal
- Go to Azure Active Directory
- Navigate to “Groups”
- Click “+ New group”
- Select “Security” as Group type
- Name your group and optionally add a description
- Choose “Assigned” as Membership type
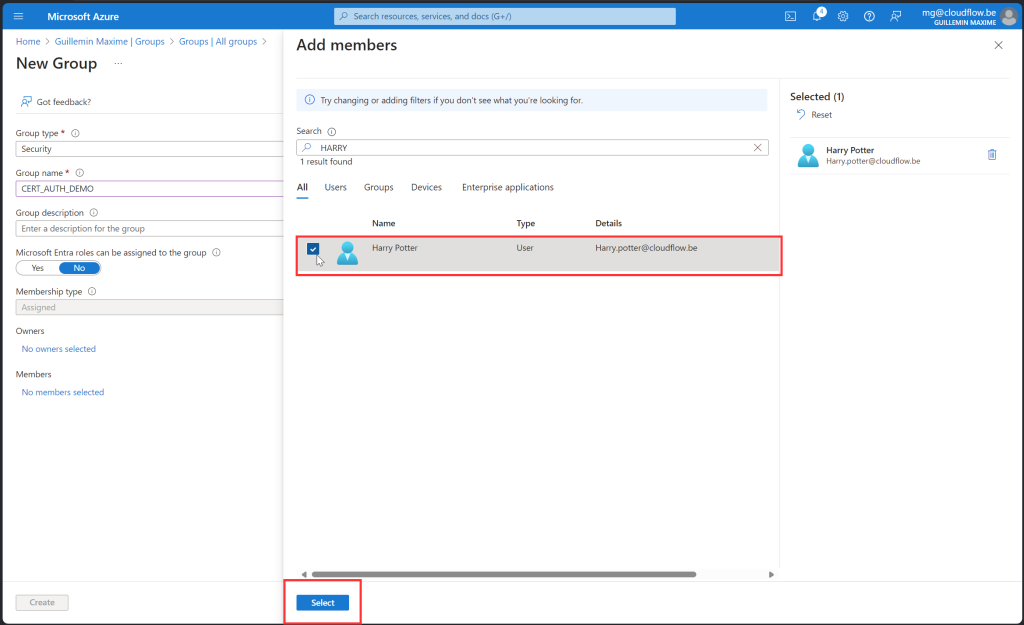
- Add your test user as a member
- Click “Create” to finish
This security group will now be used to assign all the policies we create, ensuring they are scoped to just the one test user.

Intune
Microsoft cloud PKI setup
How Does a PKI Setup Work?
Public Key Infrastructure (PKI) manages digital certificates and encryption keys, ensuring secure communications. Here’s how a typical PKI setup works:
- Root CA: The Root Certificate Authority is the trust anchor, issuing and signing certificates for subordinate CAs.
- Issuing CA: These subordinate CAs issue certificates to end users and devices, establishing a chain of trust.
- Digital Certificates: Electronic documents that verify the identity of users, devices, or servers.
- Certificate Enrollment: Users and devices request certificates from the Issuing CA, which verifies their identity and issues the certificates.
- Certificate Management: Involves issuing, renewing, and revoking certificates to ensure they remain valid and up-to-date.
- Validation: Certificates are validated by tracing the chain of trust back to the Root CA.
Architecture of Microsoft Cloud PKI
Microsoft Cloud PKI simplifies the management of public key infrastructure by using several key components. It includes a Cloud PKI service for creating and hosting certification authorities and a certificate registration authority that automatically handles certificate requests from Intune-enrolled devices using the Simple Certificate Enrollment Protocol (SCEP).
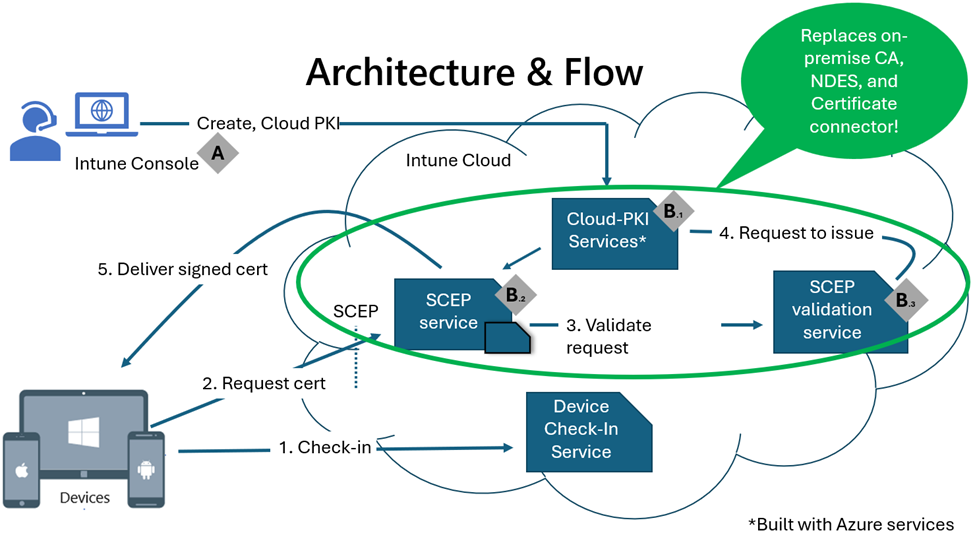
Key Components:
- Microsoft Intune: Manages device and certificate profiles.
- Microsoft Cloud PKI Services:
- Cloud PKI Service: Hosts the certification authorities.
- Cloud PKI SCEP Service: Acts as the certificate registration authority.
- Cloud PKI SCEP Validation Service: Verifies and validates certificate requests.
These components replace the need for on-premises certificate authority, NDES, and the Intune certificate connector.
Setup Actions:
- Create Certification Authorities: Set up root and issuing CAs in Microsoft Intune.
- Assign Trust Certificate Profiles: Create and assign profiles for the root and issuing CAs.
- Assign SCEP Certificate Profiles: Create platform-specific SCEP profiles.
How It Works:
- Device Check-In: Devices check in with Intune and receive trusted certificate and SCEP profiles.
- CSR Creation: Devices create a certificate signing request (CSR) and send it to the SCEP service.
- Validation: The SCEP validation service verifies the CSR against the SCEP challenge.
- Certificate Issuance: Once validated, the Issuing CA signs the CSR, and the signed certificate is delivered to the device.
Advantages:
- Simplicity: Easy to set up without complex configurations.
- Scalability: Grows with your organization without additional infrastructure.
- Integration: Seamlessly integrates with Intune for unified device and certificate management.
- Maintenance: Microsoft handles updates and uptime, reducing your maintenance efforts.
Drawbacks:
- Dependence on Internet: Requires a reliable internet connection.
- Control: Less control over the infrastructure compared to on-premises solutions.
- Cost: Can be more expensive over time due to subscription fees.
Limitations:
- A maximum of six Certification Authorities (CAs) can be created per Intune tenant.
- No option to delete or disable a CA in the admin center.
- The admin center only displays the first 1,000 issued certificates.
- During a trial, created CAs use software-backed keys that can’t be converted to HSM-backed keys later.
By choosing Intune Cloud PKI, you streamline certificate management, enhance security, and reduce administrative burden.
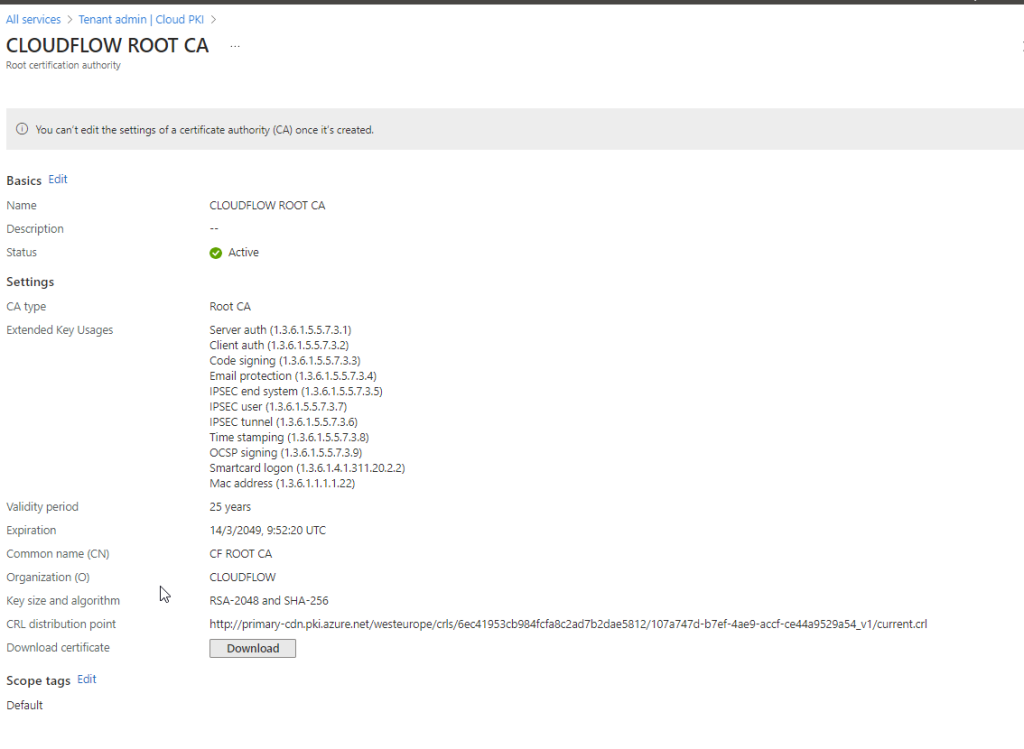
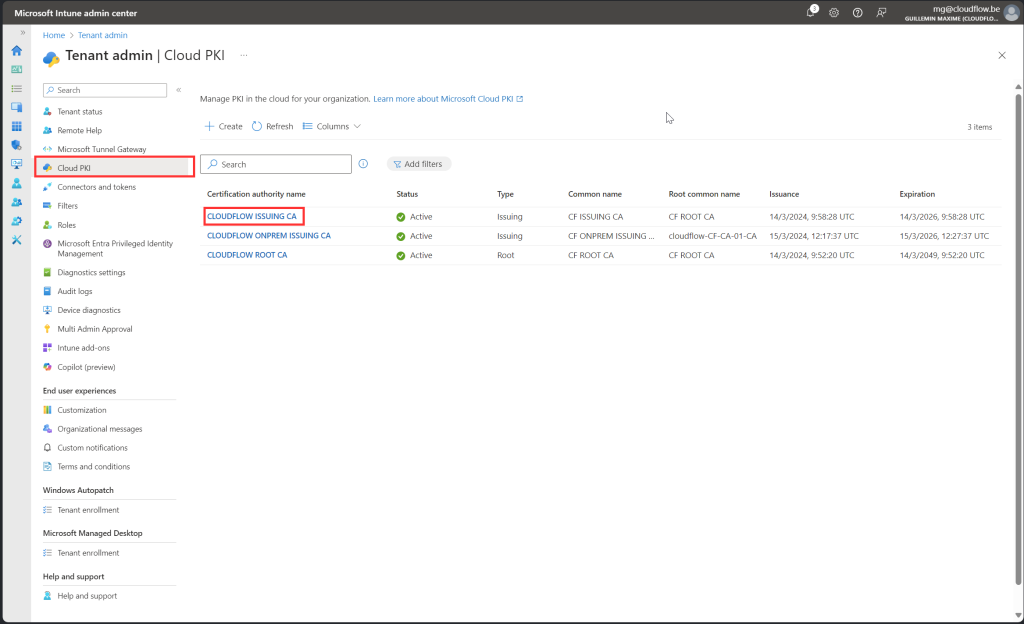
Root CA
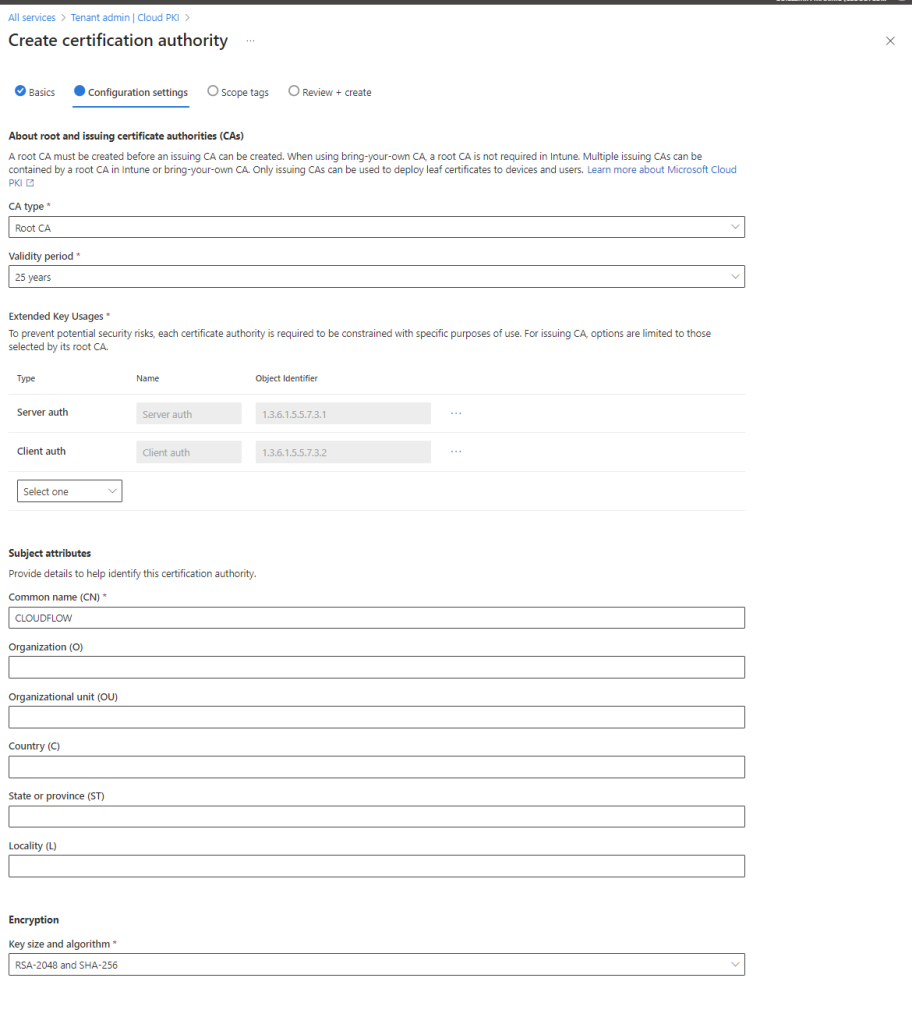
A Root Certificate Authority (Root CA) is the top-most authority in a Public Key Infrastructure (PKI) hierarchy. It acts as the trust anchor for all certificates issued within the PKI system. The Root CA’s certificate is self-signed and is used to sign other subordinate CA certificates, creating a chain of trust. This ensures that any certificate issued by the subordinate CAs can be traced back to the trusted Root CA.
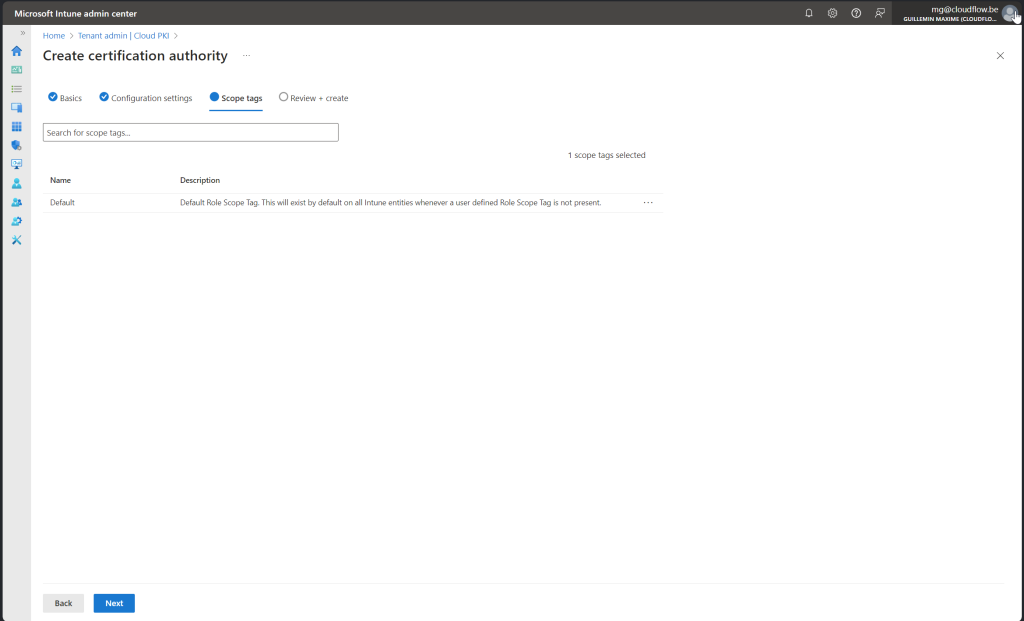
Now, we’ll be setting up a Root CA. In my demo, I selected all extended key usage options. This isn’t best practice; you should select only what you need. Because this is a testing environment and I can only create six CAs, I took a shortcut. For a real use case, you should only select “Server Authentication” and “Client Authentication.”
- Go to Intune
- Click on Tenant administration
- Click on CloudPKI
- Click on “create”
- CA Type : Root CA
- Validity Period: 25 Years
- Extend key usage
- Select: Server auth
- Select: Client auth
- Fill in Subject atributes
- Select Encryption RSA-2048 and SHA-256
- Click Next
- Click Next
- Review and Click Create
Once you create and download the Root CA certificate, keep it handy. You’ll need it in one of the next steps to deploy the root Certificate to our endpoints.
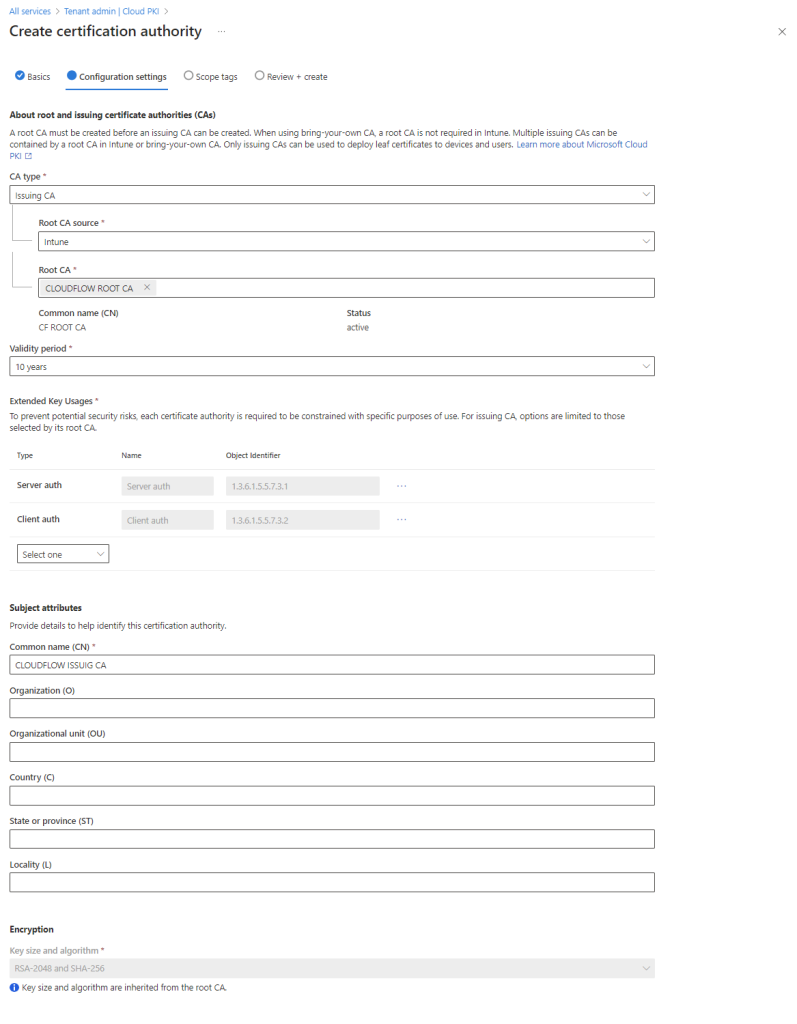
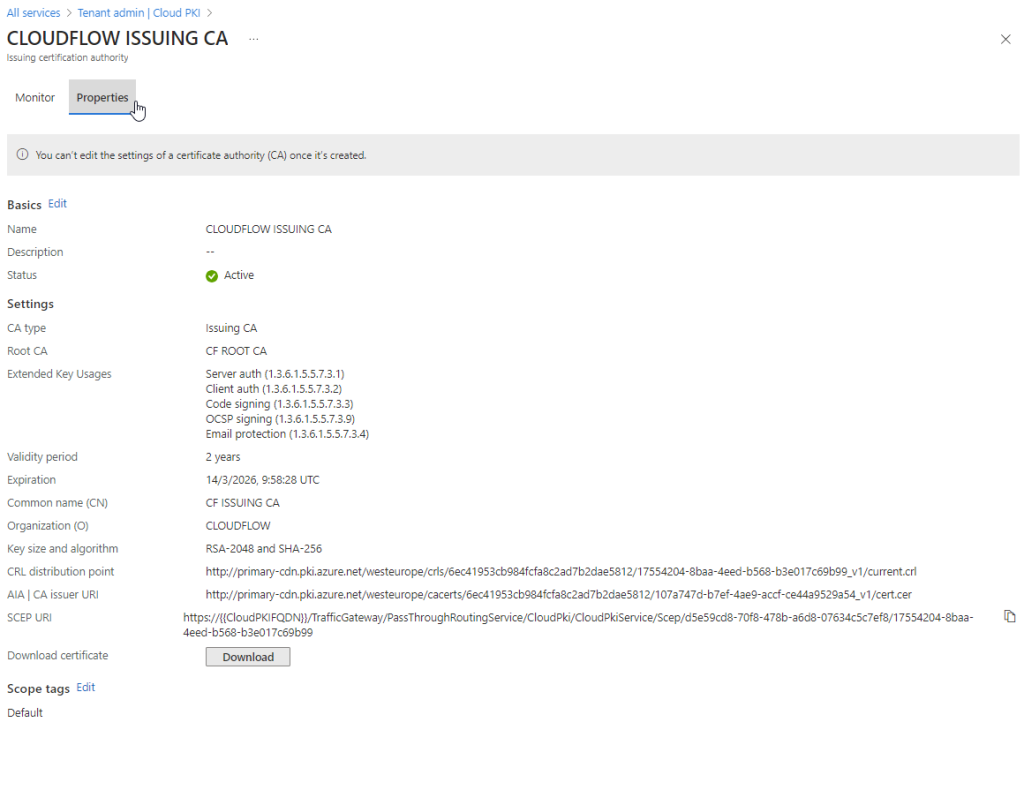
Issuing CA
After creating the Root CA, the next step is to set up the Issuing CA. Here’s how to do it and what it does:
What is an Issuing CA?
An Issuing CA (Certificate Authority) is responsible for issuing and managing certificates to end users and devices. It works under the Root CA, handling the bulk of the work in a PKI environment. Essentially, while the Root CA is the trust anchor, the Issuing CA is the operational component that actually hands out certificates.
- Go to Intune
- Click on Tenant administration
- Click on CloudPKI
- Click on “create”
- CA Type : Issuing CA
- Root CA Source : Intune
- Root CA : Select root CA you just created
- Validity Period: 10 Years
- Extend key usage
- Select: Server auth
- Select: Client auth
- Fill in Subject atributes
- Select Encryption RSA-2048 and SHA-256
- Click Next
- Click Next
- Review and Click Create
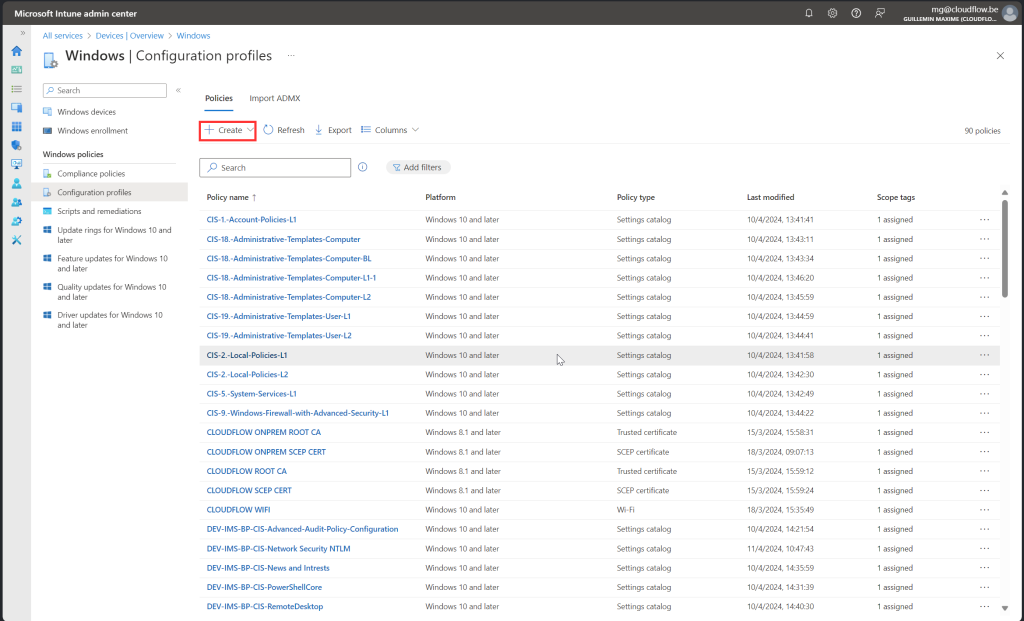
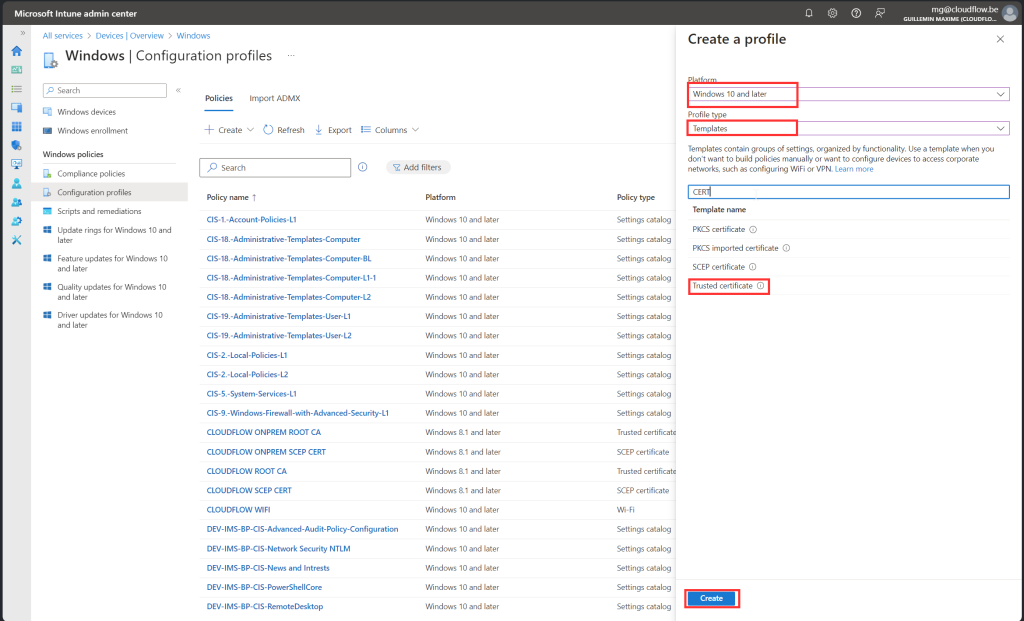
Intune Configuration Policy’s
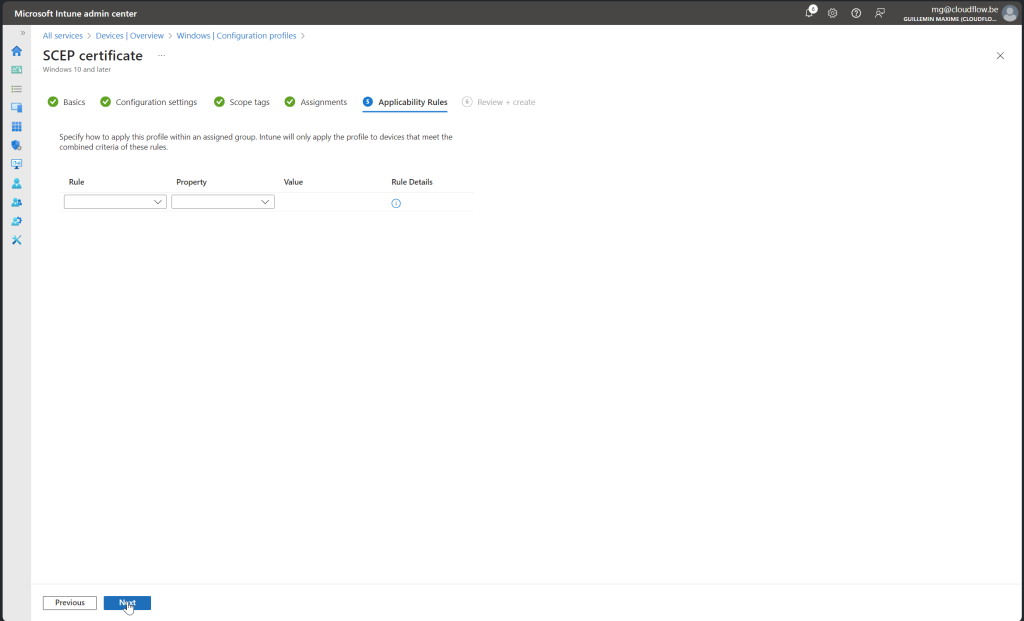
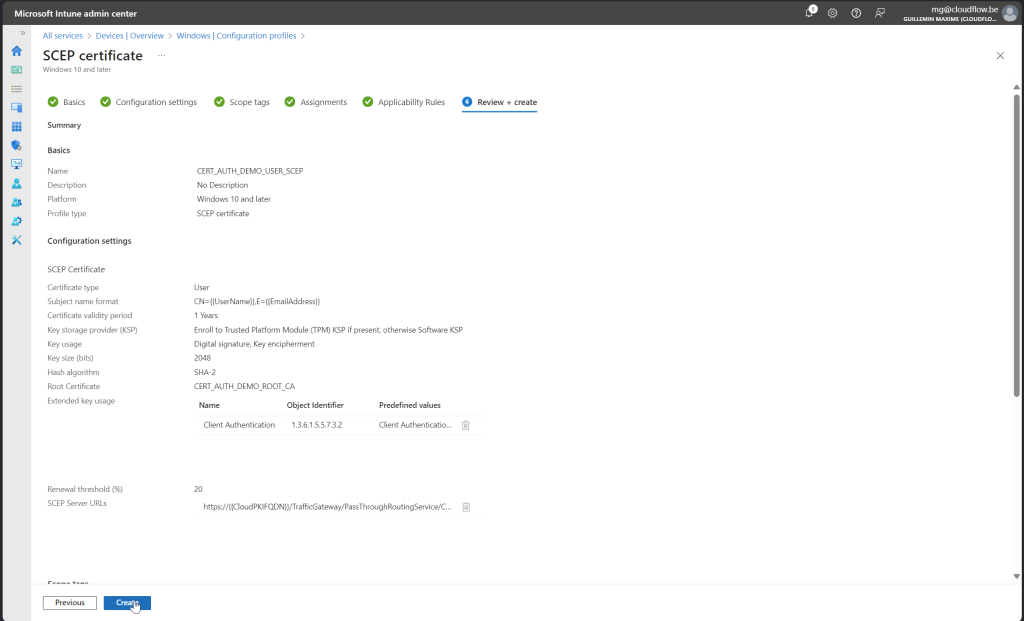
Now we will be setting up the Intune configuration policies. Follow along with the screenshots provided.
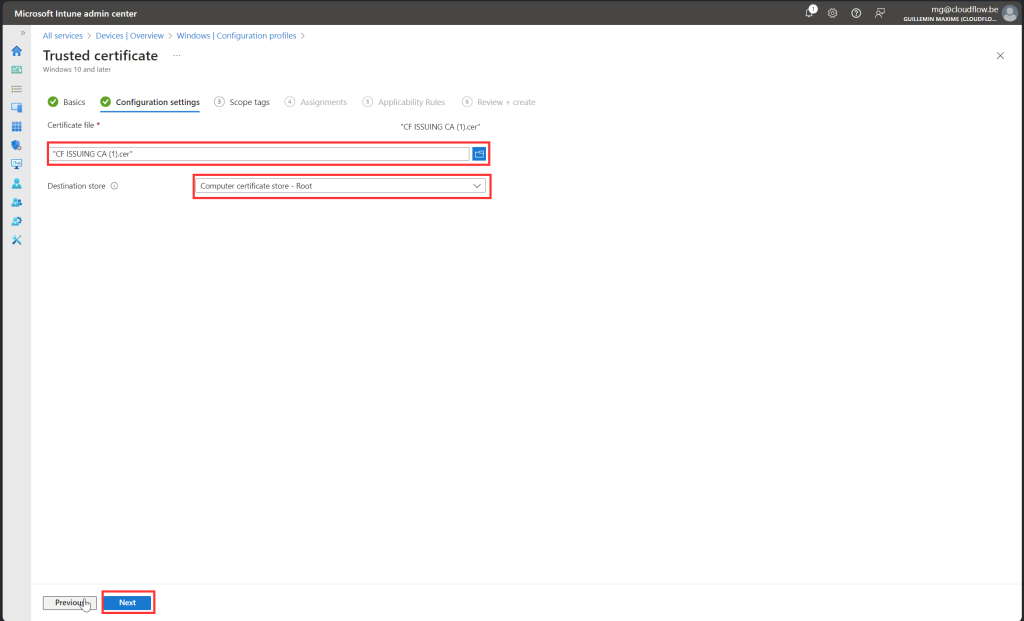
Step 1: Deploy the Root Certificate
- Create Configuration Policy: Start by creating a policy to deploy the root certificate you downloaded earlier.
- Assign Policy: Make sure you assign the policy correctly to avoid deployment issues.
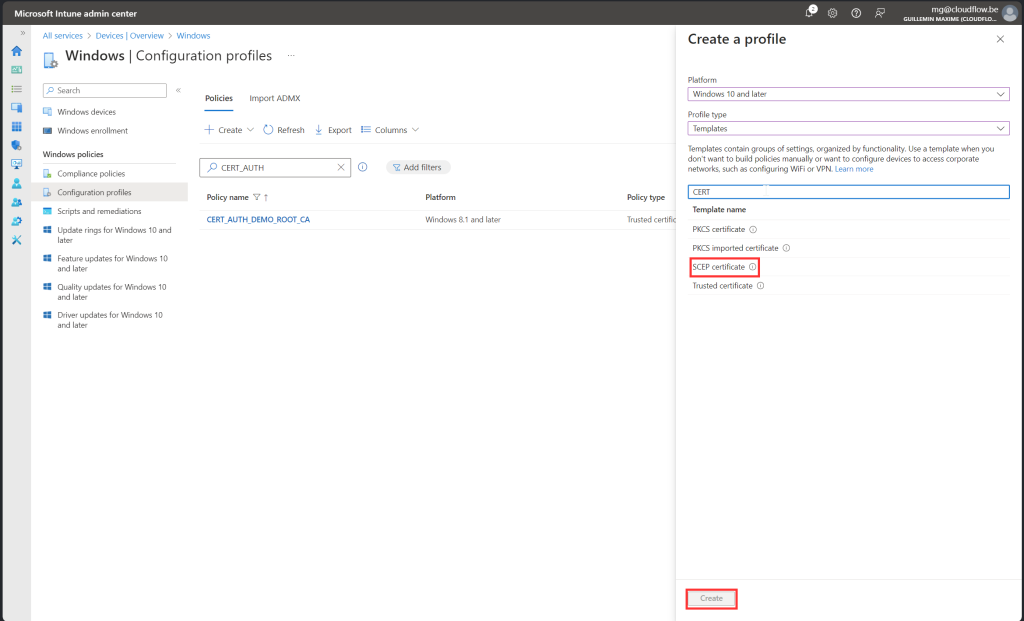
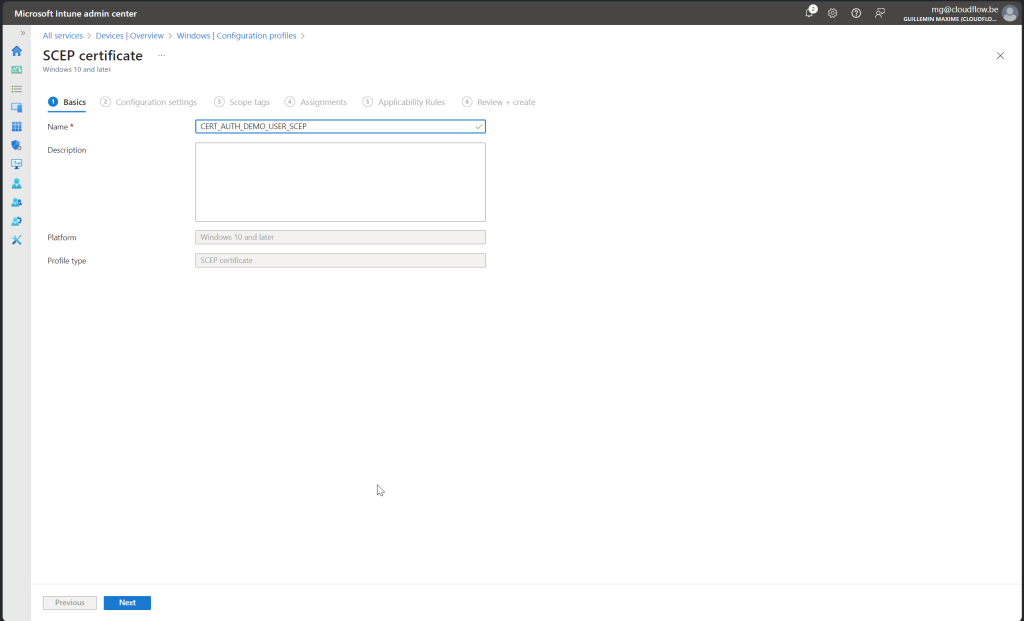
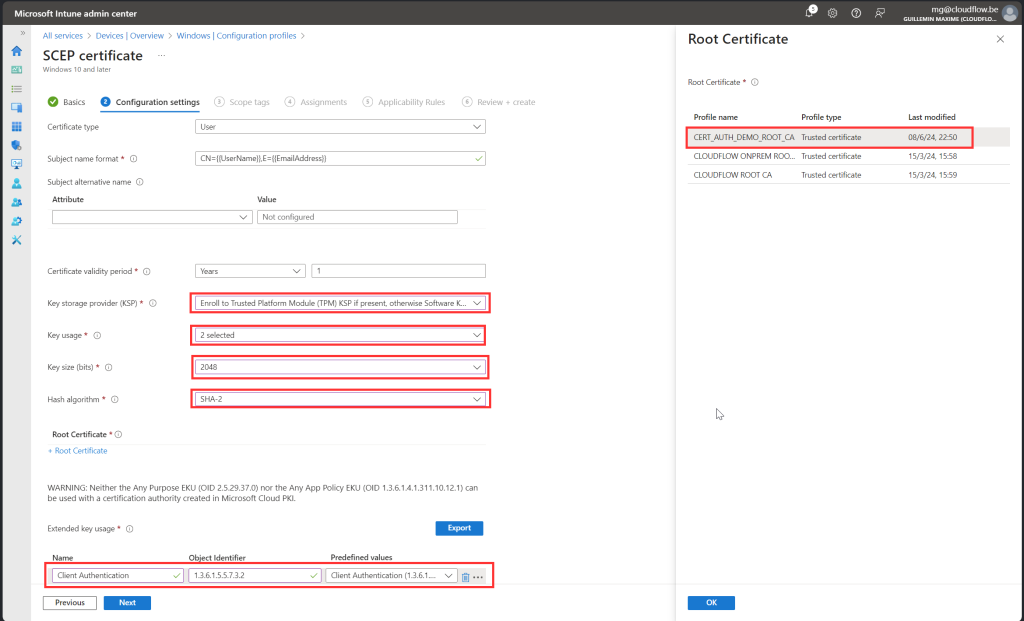
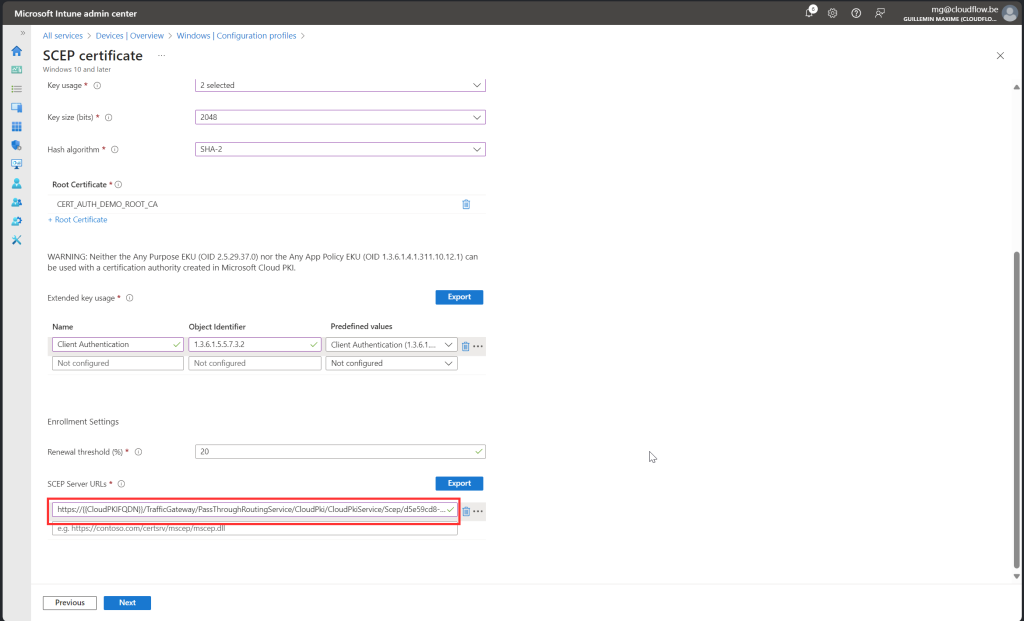
Step 2: Deploy the SCEP Certificate
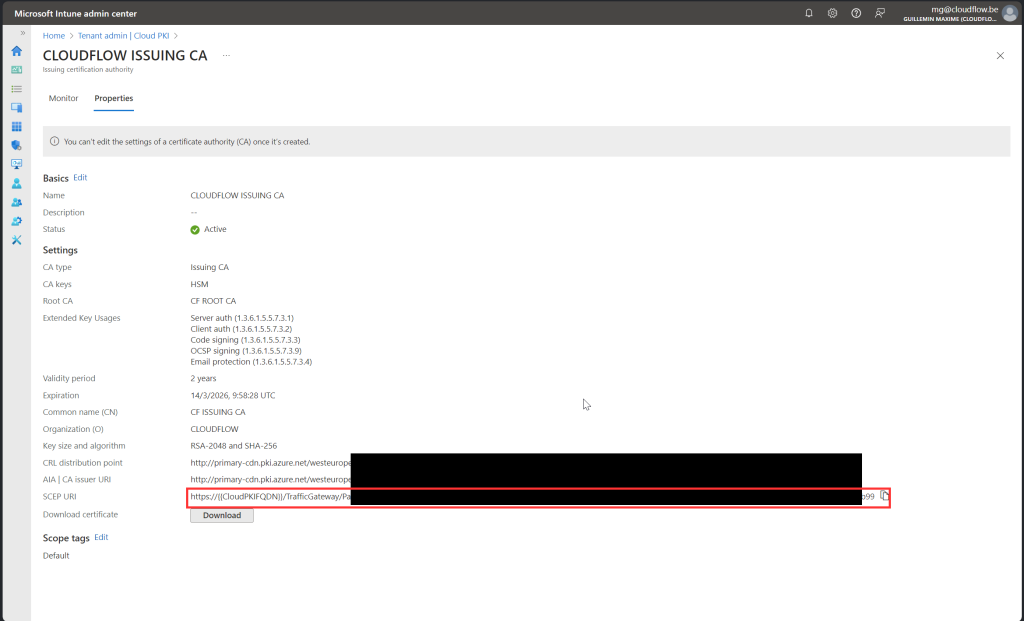
- Create Configuration Policy: Next, create a policy to deploy the SCEP certificate. You will also need the scep uri witch you can find on your issuing ca configuration. This certificate will be used to authenticate with EntraID.
- Correct Assignments: Properly assign the policy to ensure successful deployment.
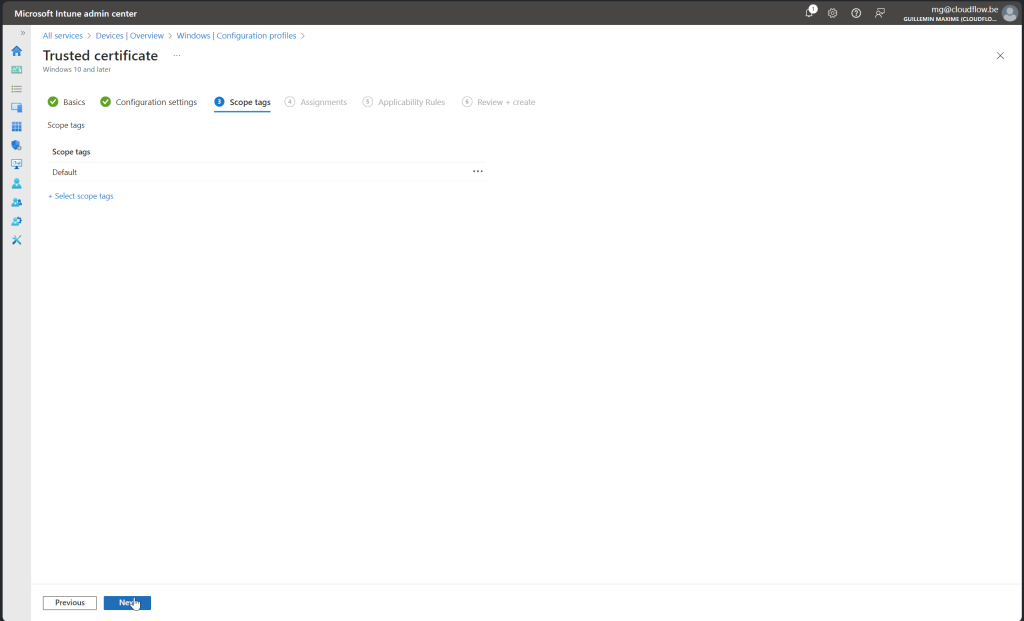
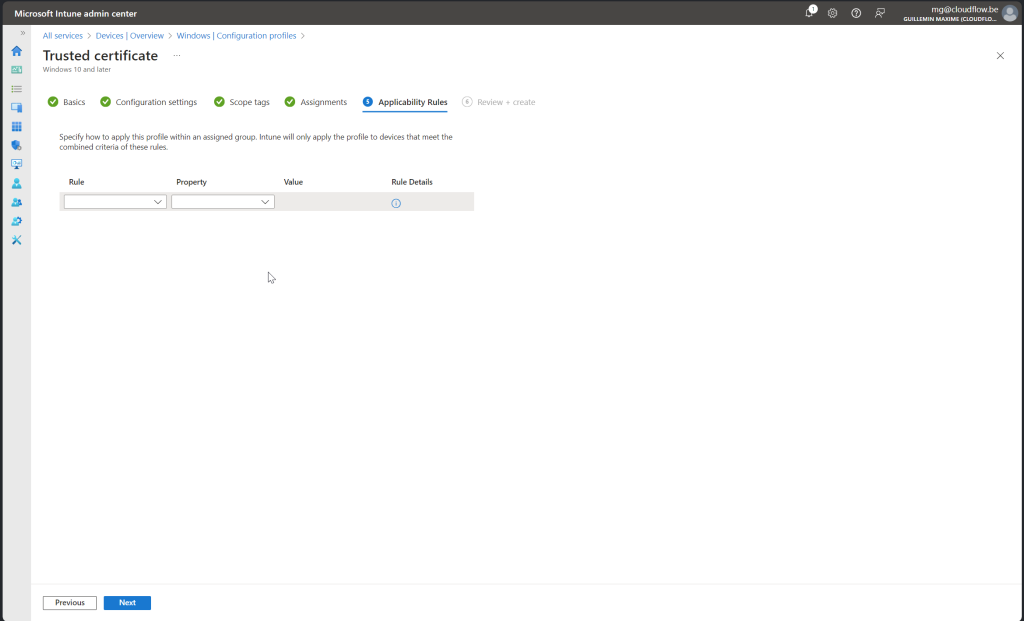
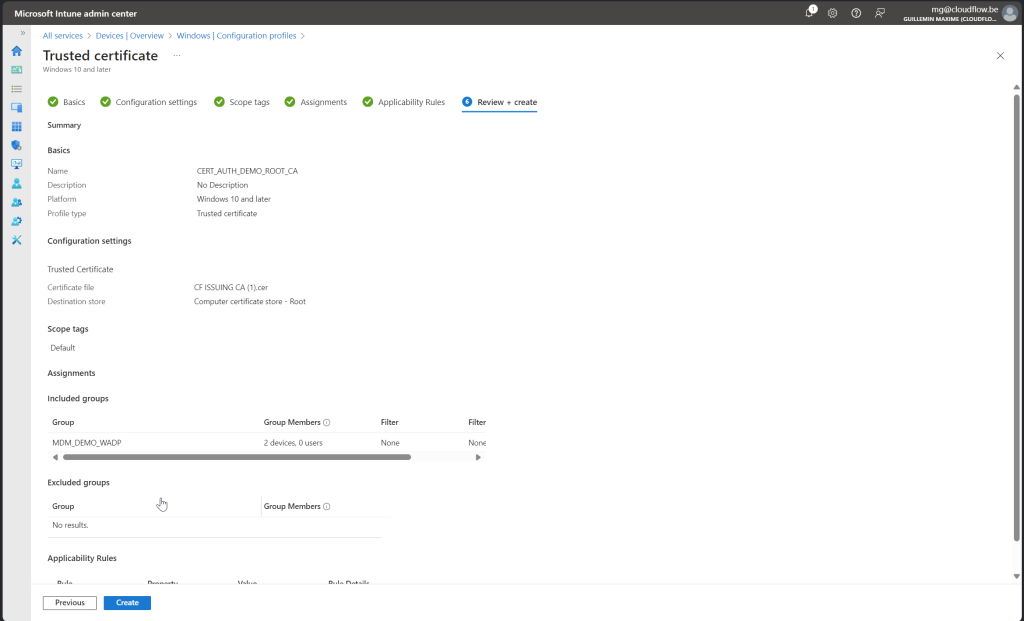
Root & SCEP Certificate Assignment options
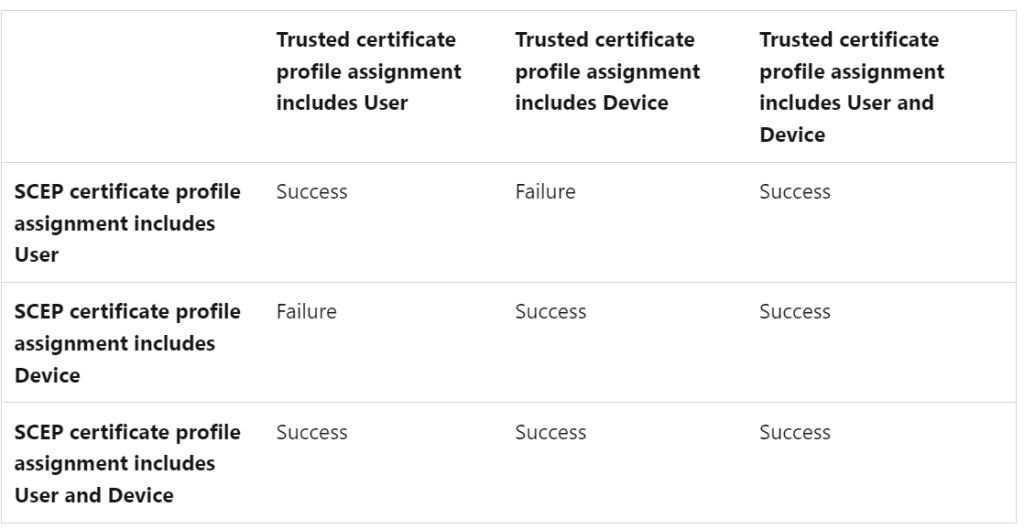
Trusted Root Certificate
Follow along with screenshot below how to configure policy for root certificate

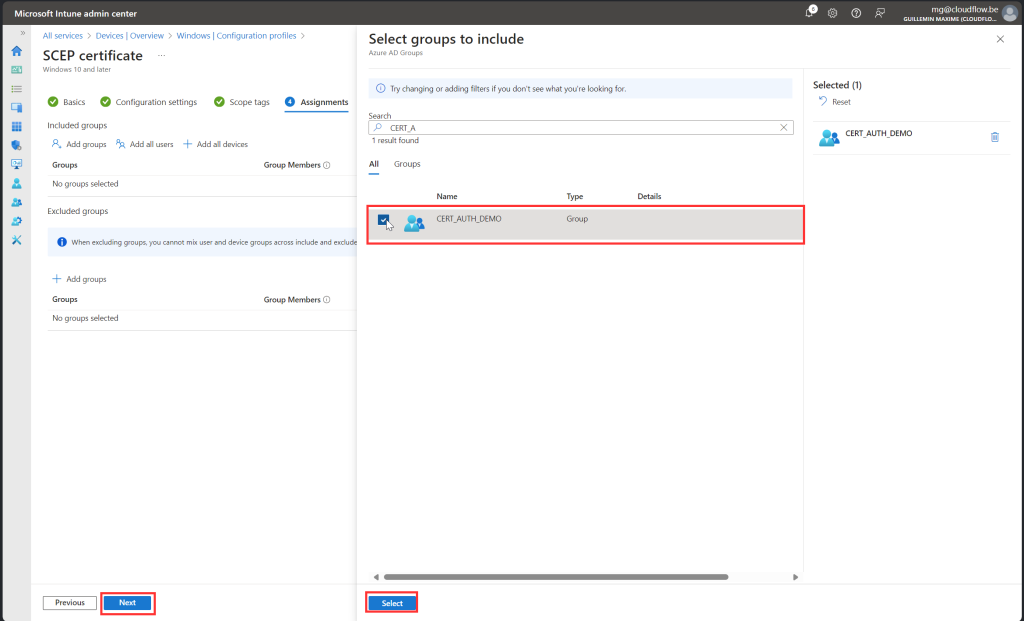
SCEP Certificate
Follow along with screenshot below how to configure policy for scep certificate

User Certificate Store
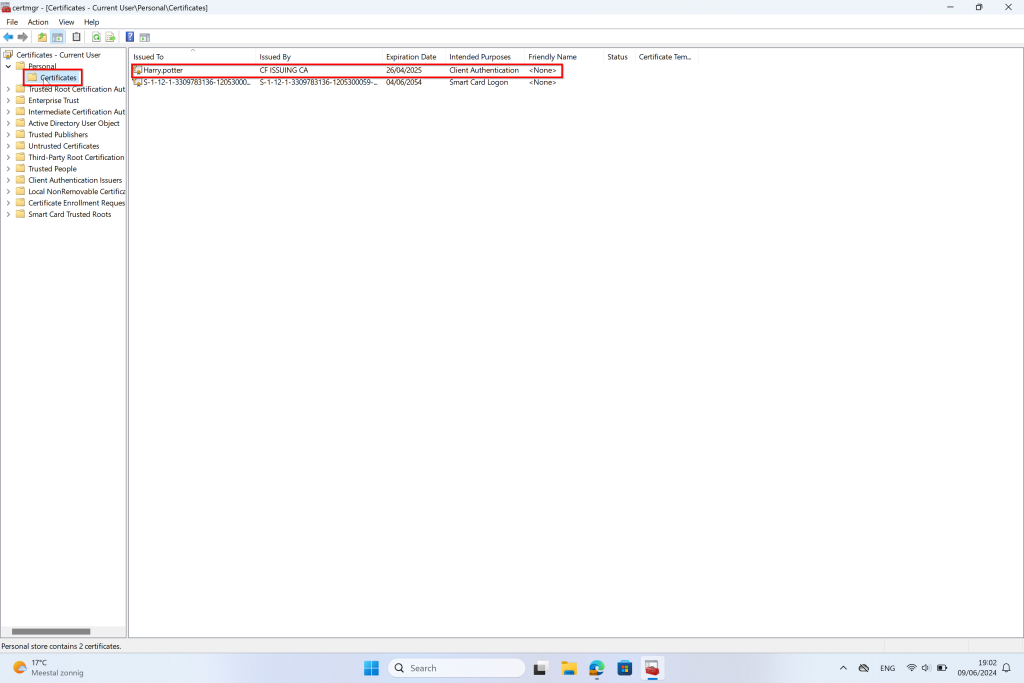
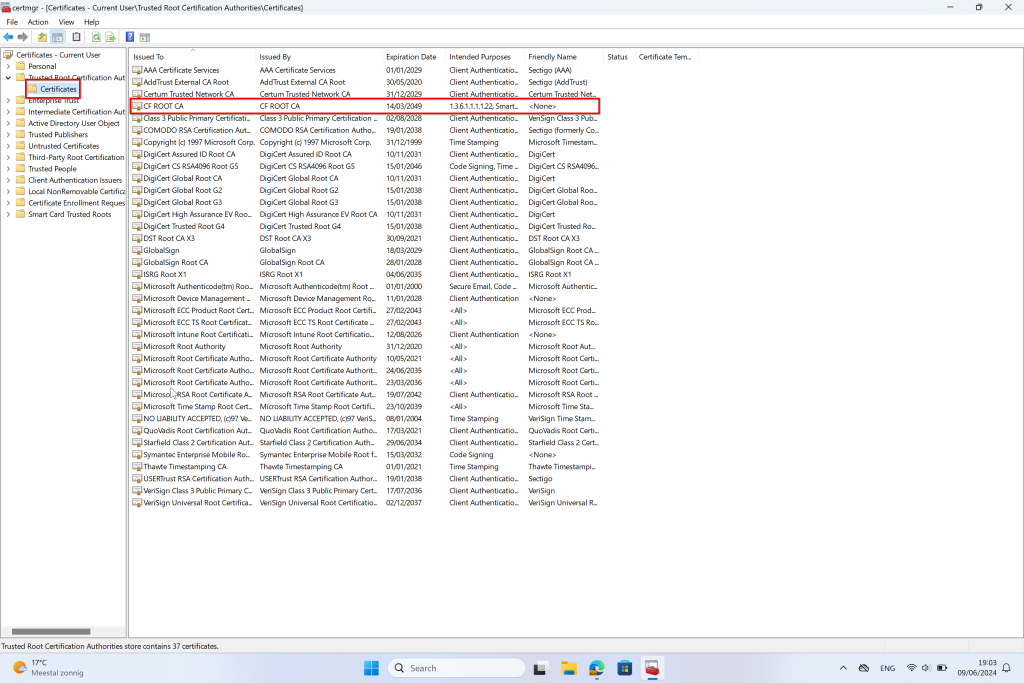
Once we have deployed the policies, you can verify the certificates on the test user’s endpoint. Follow these steps:
- Open the User Certificate Store:
- SCEP Certificate: Navigate to
Current User > Personal > Certificates. You should find the SCEP certificate here. - Root Certificate: Navigate to
Current User > Trusted Root Certification Authorities. You should find the root certificate here.
- SCEP Certificate: Navigate to
Ensure both certificates are present to confirm that the deployment was successful.
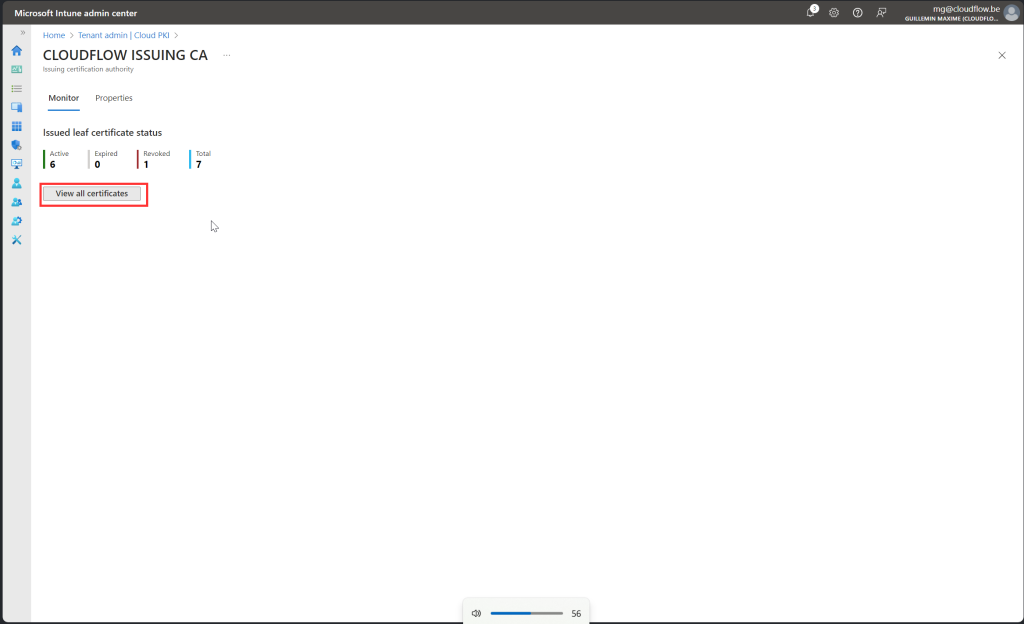
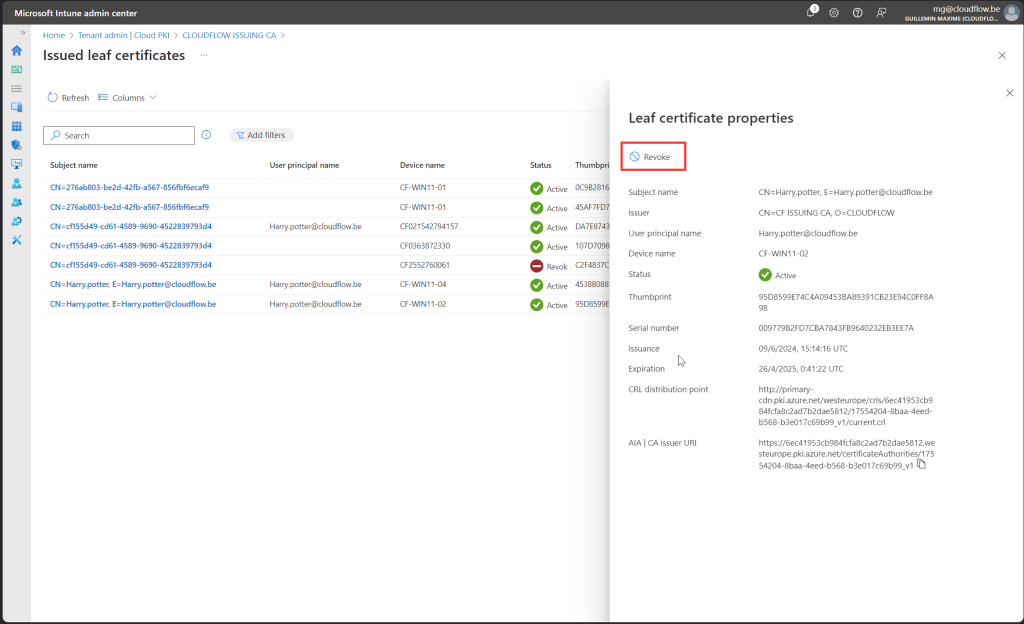
Revoking Certificates
If you need to revoke certificates, you can do so via the Intune portal. Here’s how:
- Access Intune Portal: Go to the Intune portal.
- Navigate to Cloud PKI:
- Go to
Tenant Administration. - Select
Cloud PKI.
- Go to
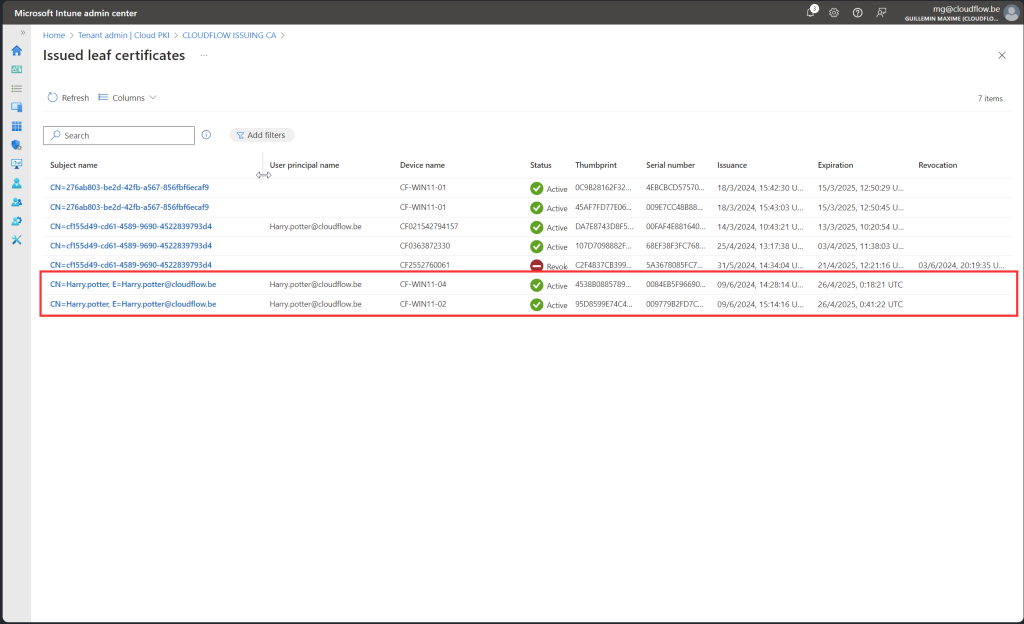
- Find Issuing CA: Click on
Issuing CAand thenView All Certificates. - Revoke Certificate:
- Click on the certificate you want to revoke.
- Click on
Revoke.
Important: Only revoke certificates after completing the demo setup, as you will need the certificate for the demonstration.
Following these steps ensures you can manage and revoke certificates when necessary, maintaining security and control over your PKI deployment.
Entra ID
Now that we’ve set up our Cloud PKI and deployed the necessary certificates via Intune, we can move on to the exciting part: enabling certificate-based authentication for users with Entra ID. This step enhances security by ensuring only authenticated users can access resources using digital certificates.
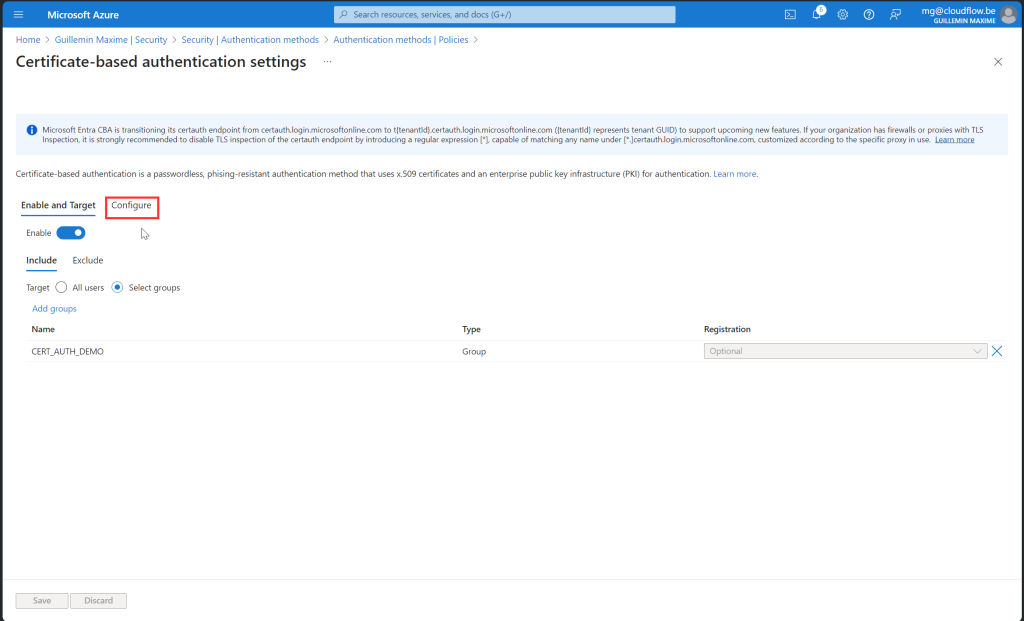
First, we’ll need to add a Certificate Authority. Once this is in place, we can configure the new authentication method to allow users to authenticate with their certificates. This setup will provide a seamless and secure authentication experience for your organization.
Certificate Authority
Issuing CA
Log in to the Azure Portal:
- Visit Azure Portal and sign in.
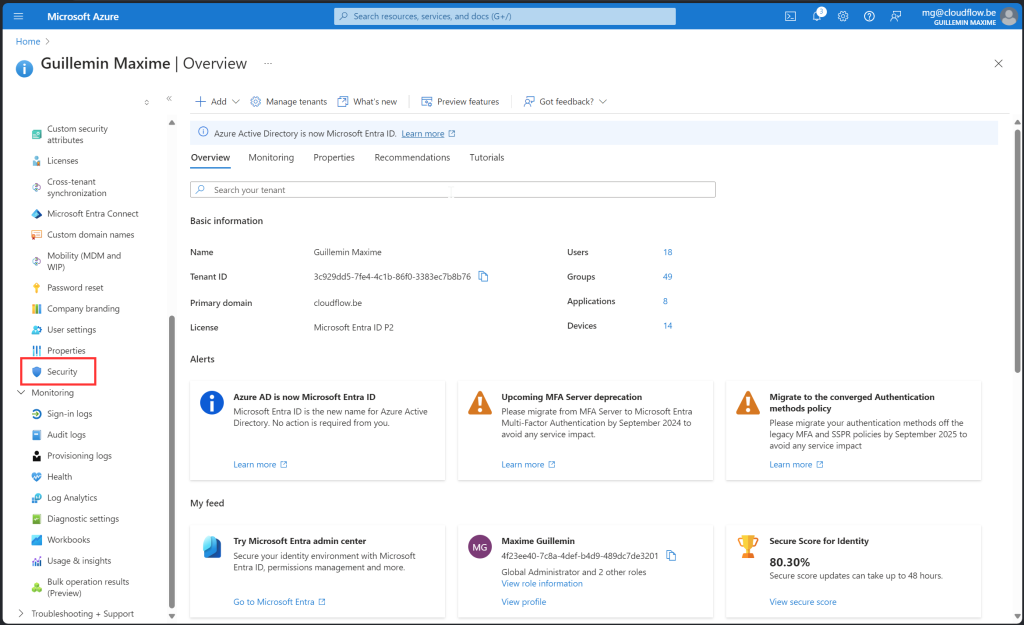
Navigate to Azure AD:
- In the left-hand menu, select “Azure Active Directory.”
Go to the Security Tab:
- Click on
Security.
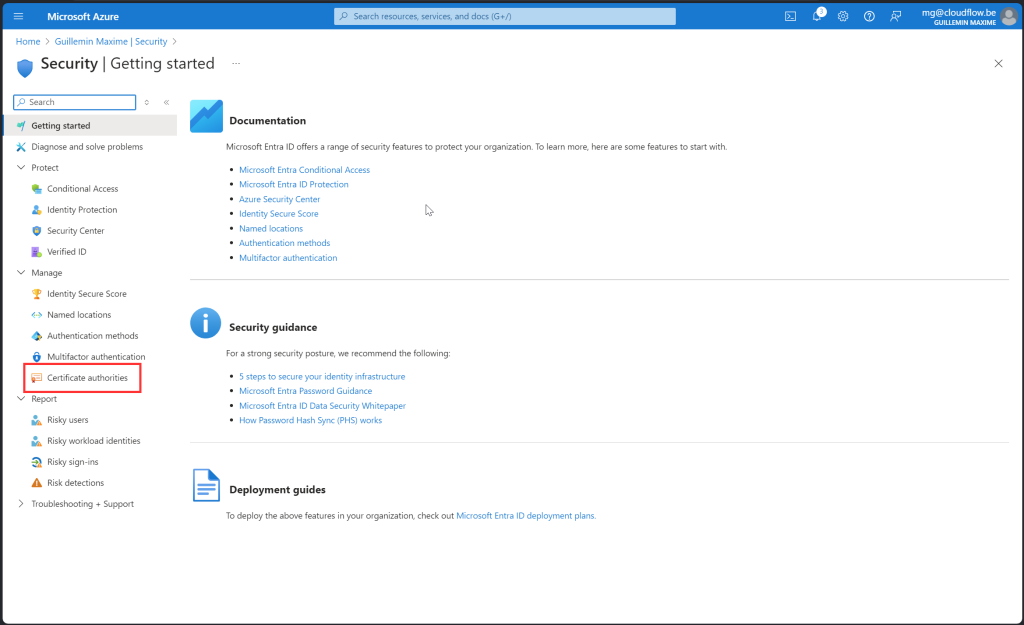
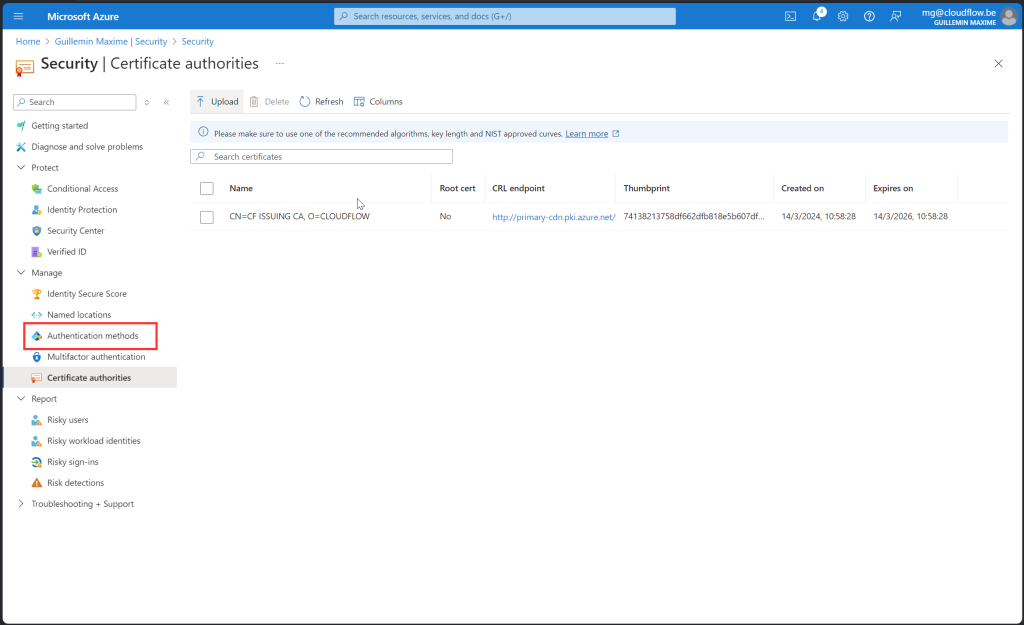
Access Certificate Authorities:
- Select
Certificate Authorities.
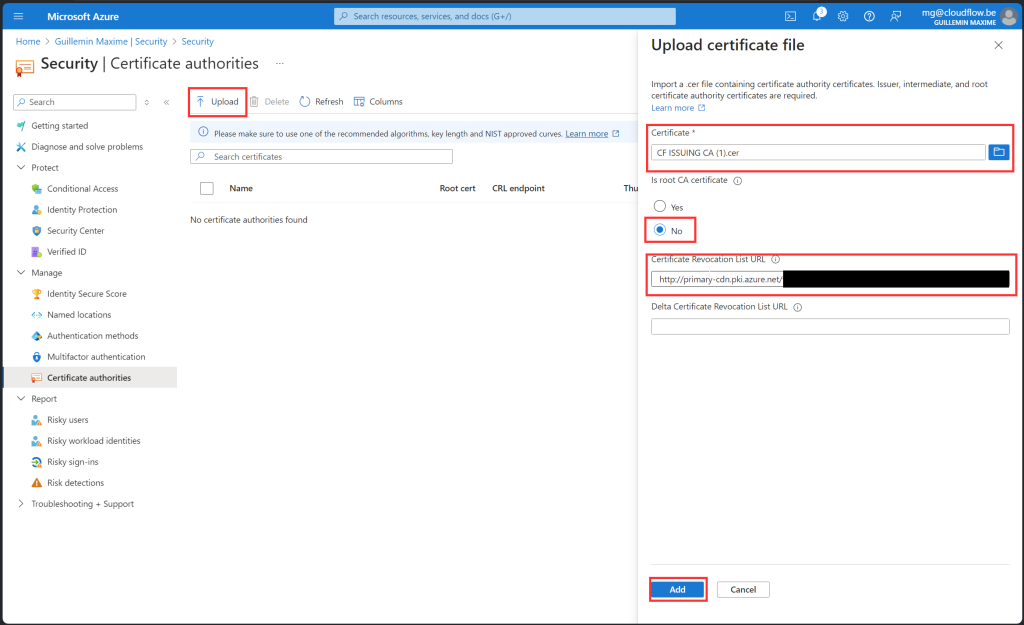
Add a Certificate Authority:
- Click
+ Add. - Choose “Subordinate CA” instead of “Root CA”.
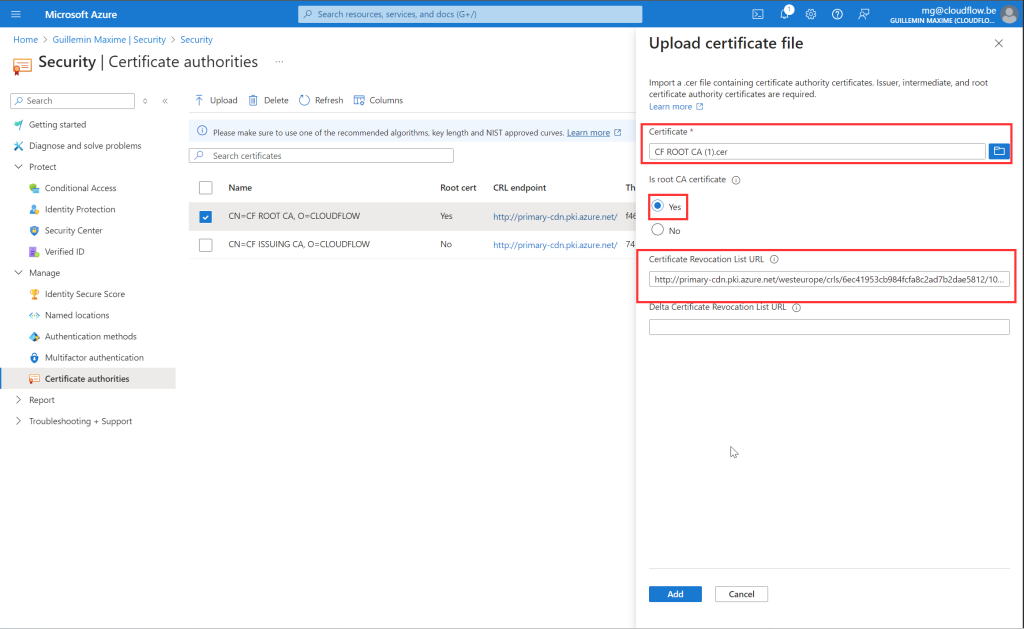
Configure the CA:
- Download the Issuing CA Certificate from the intune portal.
- Upload the signed certificate back into the portal.
- Fill in the Certificate Revocation List URL you can find it in the Intune portal
Complete the Setup:
- Follow the prompts to finalize the configuration.
Root Certificate
Add a Certificate Authority:
- Click
+ Add. - Choose “Root CA”.
Configure the CA:
- Download the root CA Certificate from the intune portal.
- Upload the signed certificate back into the portal.
- Fill in the Certificate Revocation List URL you can find it in the Intune portal
Complete the Setup:
- Follow the prompts to finalize the configuration.
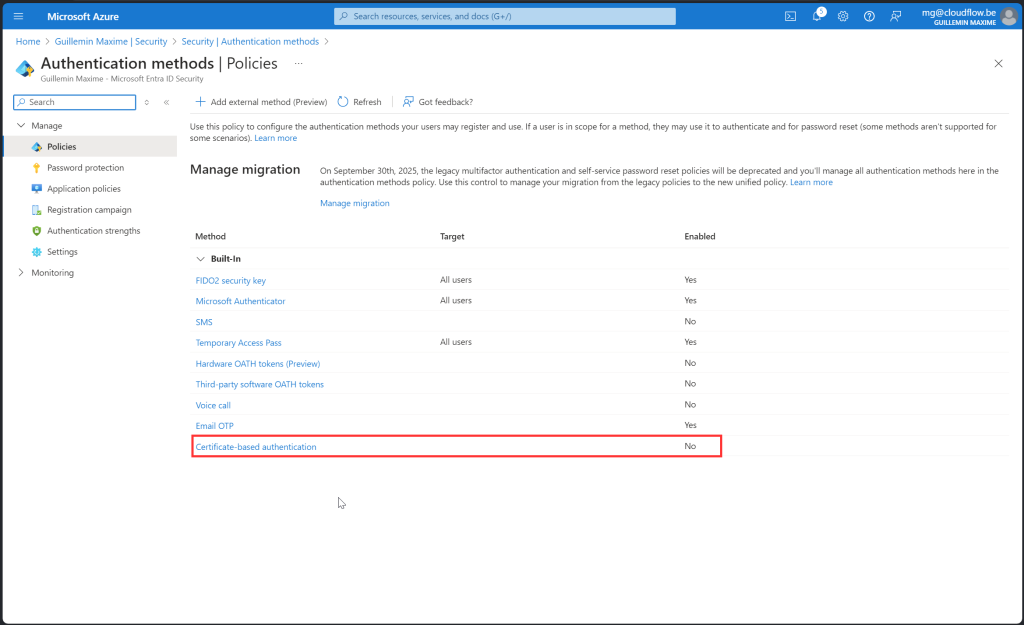
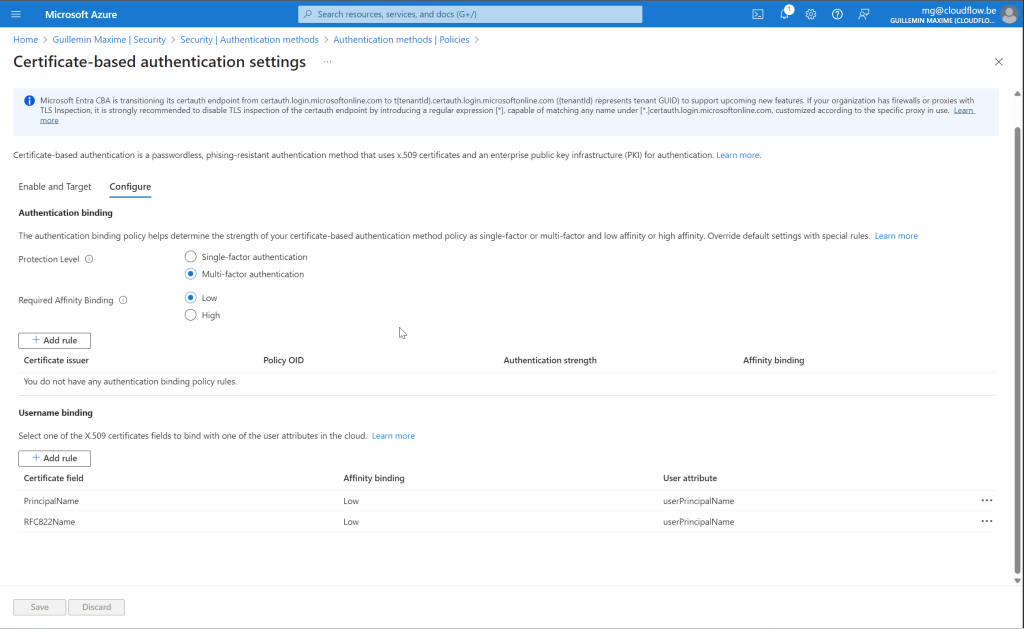
Certificate Based Authentication
Purpose: Defines the security level and characteristics of certificate-based authentication, determining if methods are single-factor or multi-factor and their affinity with users or devices.
Key Concepts:
- Certificate-Based Authentication: Uses digital certificates to verify identity, involving PKI.
- Strength:
- Single-Factor Authentication (SFA): When Selecting this option it only counts a SFA authentication method like a password
- Multi-Factor Authentication (MFA): When Selecting this option it counts, like a MFA authentication for example Password + Phone authentication.
- Affinity:
- Low Affinity: Lower assurance, suitable for less sensitive tasks.
- High Affinity: Higher assurance, needed for sensitive tasks.
Customization:
- Special rules can override default settings to meet specific security needs. If you have multiple certificate issuers, you can specify stricter policies that take precedence over the default configuration.
Protection Levels:
- Single-Factor Authentication: For low-risk environments.
- Multi-Factor Authentication: For high-risk environments.
For the Demo:
- Protection Level: Multi-Factor Authentication (MFA)
- Affinity: Low
Summary: The policy helps enforce the strength of authentication methods, choose between single and multi-factor authentication, set appropriate affinity levels, and tailor policies to specific needs, enhancing security and protecting sensitive information.

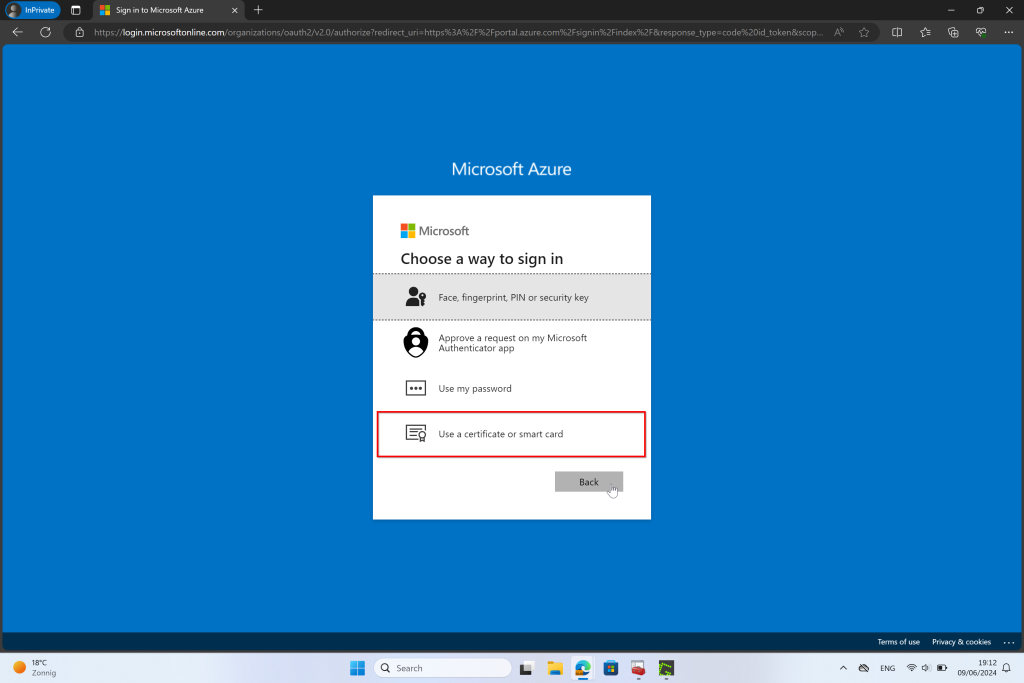
User Experience
Below, you can find an overview of the user experience for both single and multi-factor authentication. It’s important to note that any Conditional Access (CA) policies with specific authentication strength settings can impact this experience. For example, if your CA policy is set to Passwordless with Certificate-Based Authentication (MFA), users will still be required to use multi-factor authentication even if you initially selected single-factor authentication. This additional layer ensures enhanced security, aligning with your organization’s policies. We will explore this topic in greater depth and provide more detailed guidance in the next blog post. Stay tuned for further insights!
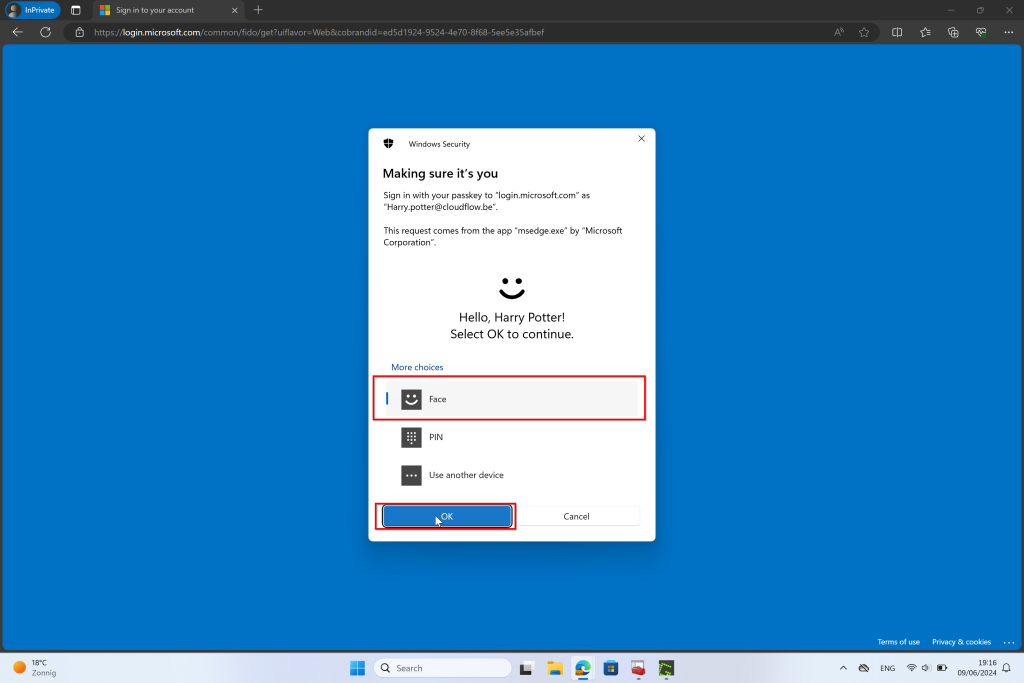
MFA Authentication
Multi-Factor Authentication (MFA) with Certificate-Based Authentication (CBA) is a robust security mechanism designed to enhance the protection of user accounts and sensitive data. This method combines two layers of security: something the user has (a digital certificate) and something the user knows or possesses (such as a password or biometric factor).
How It Works:
- Authentication Process:
- Step 1: User Identification: The user attempts to access a system by entering their username.
- Step 2: Certificate Validation: The system prompts the user to present a digital certificate. This certificate is verified against a trusted CA to ensure its validity.
- Step 3: Second Factor: In addition to the certificate, the user must provide another form of authentication. This could be a password, a one-time code sent to their phone, or a biometric factor such as a fingerprint or facial recognition.


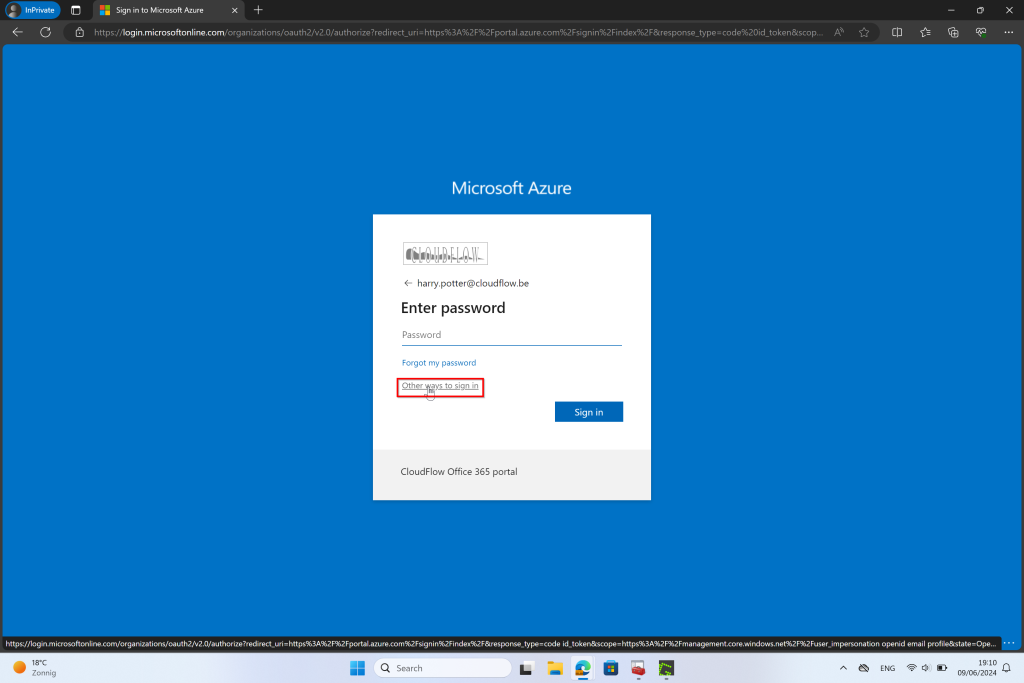
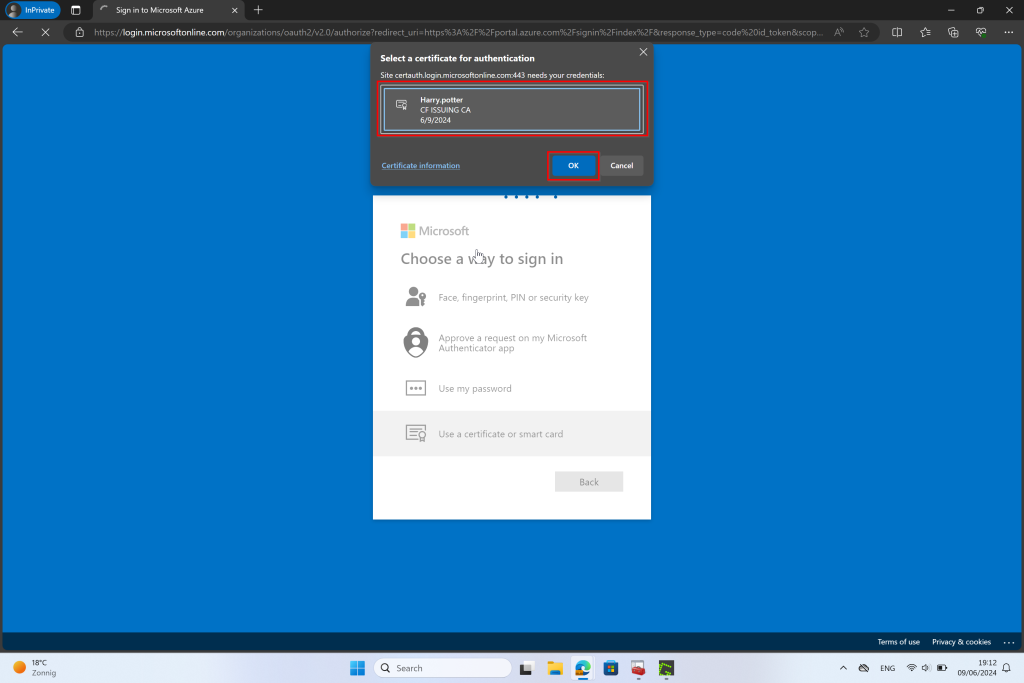
Single Factor Authentication
Single Factor Authentication (SFA) with Certificate-Based Authentication (CBA) leverages digital certificates as the sole authentication factor to verify a user’s identity. This approach is considered more secure than traditional password-based authentication, as it uses cryptographic methods to ensure authenticity.
How It Works:
- Authentication Process:
- Step 1: User Identification: The user attempts to access a system or application.
- Step 2: Certificate Presentation: Instead of entering a password, the user’s device presents the digital certificate to the system.
- Step 3: Certificate Validation: The system verifies the certificate against a trusted CA to ensure its validity and checks that it has not been revoked or expired.
- Step 4: Access Granted: If the certificate is valid, access is granted without the need for any additional authentication factors.

Conclusion Part 1
In this post, I’ve walked you through setting up certificate-based authentication using Microsoft EntraID, Intune Cloud PKI, and Intune for endpoint configurations. We started with the basics of certificate-based authentication, covered its benefits, and detailed the steps to create and deploy Root and Issuing Certificate Authorities. We also set up the necessary Intune configuration policies to ensure secure and efficient certificate management.
By now, you should have a good understanding of how to implement both single and multi-factor authentication using digital certificates. While single-factor authentication offers a significant security improvement over traditional passwords, multi-factor authentication with certificate-based methods provides an even stronger security framework.
In my next post, I’ll go deeper into how you can combine these authentication methods with Conditional Access Policies to further enhance security. I’ll also explore various use cases to help you see when and where these methods might be most beneficial for your organization. Stay tuned for more details.


3 Comments